Honda Transmission Fluid Change: Essential OEM Tips
📌 Quick Summary Always use genuine Honda OEM fluids like DW-1 or HCF-2 to maintain the integrity of your vehicle’s transmission system….
Always use genuine Honda OEM fluids like DW-1 or HCF-2 to maintain the integrity of your vehicle’s transmission system. Performing a drain-and-fill procedure rather than a pressurized flush is critical to avoid damaging internal components.
🎯 Key Takeaways
- Use only Honda DW-1 for automatics or HCF-2 for CVTs.
- Always replace the aluminum crush washer to prevent leaks.
- Perform a gravity drain-and-fill; never use a machine flush.
- A 3/8-inch square ratchet drive is required for the plug.
- Check fluid levels only when the engine is at operating temperature.
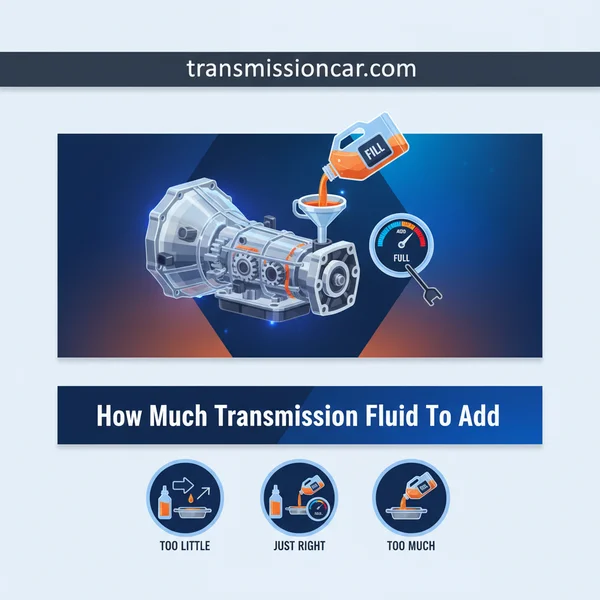
To change your Honda’s transmission fluid correctly, you must perform a “drain and fill” rather than a high-pressure flush. You will need roughly 3.5 to 4 quarts of genuine Honda fluid—either ATF DW-1 for traditional automatics or HCF-2 for CVTs—along with a new 18mm aluminum crush washer. Using the wrong fluid or a generic “multi-vehicle” brand can lead to immediate shift quality issues or long-term belt slippage in CVT models.
Performing this service yourself every 30,000 miles is the single best way to prevent the dreaded “Honda shudder” and torque converter clutch wear. By handling the fluid change at home, you ensure that only OEM-spec lubricants enter the system. This protects the sensitive internal friction plates that Honda designs for specific viscosity levels. Skipping this maintenance often leads to gear hunting and expensive solenoid failures as the fluid breaks down over time.
Selecting the Correct Honda Fluid Types (DW-1 vs. HCF-2)
Honda is notoriously picky about transmission chemistry. Using a “universal” fluid from a local parts store often results in harsh shifts. This happens because the friction modifiers do not match Honda’s factory specifications. You must identify whether your vehicle uses a traditional geared automatic or a Continuously Variable Transmission (CVT) before buying supplies.

Honda ATF DW-1 for Automatic Transmissions
If your Honda has a traditional automatic transmission, it requires Honda ATF DW-1. This fluid replaced the older Z-1 spec and is fully backwards compatible with older models. It is designed specifically for Honda’s unique “clutch-to-clutch” shifting logic.
- Typical Models: V6 Accords (pre-2018), Pilots, Odysseys, and older Civics.
- Characteristics: Low viscosity for better fuel economy and smoother cold-weather shifting.
- Capacity: Most drain-and-fill procedures require 2.6 to 3.5 quarts depending on the specific year.
- Visual Check: DW-1 is bright red when new and turns dark cherry or brown as it ages.
Honda HCF-2 for CVT Systems
Modern Hondas, including most 4-cylinder Civics, Accords, and CR-Vs built after 2013, utilize a CVT. These must use Honda HCF-2. Using DW-1 in a CVT—or HCF-2 in a standard automatic—will cause catastrophic internal damage within miles.
- Identification: Look for “CVT” stamped on the dipstick handle or a yellow “HCF-2” sticker under the hood.
- Critical Note: HCF-2 is an amber/yellowish fluid, unlike the red ATF. Do not mix them.
- Application: This fluid is specifically engineered to provide the high friction required for the steel belt to grip the pulleys.
The Ultimate Honda Transmission Fluid Walkthrough
Maintaining your Honda’s transmission is perhaps the most critical service you can perform to ensure your vehicle reaches the 200,000-mile mark and beyond. Unlike many other manufacturers that suggest “lifetime” fluids, Honda transmissions rely on a specific “drain and fill” procedure to keep the internal clutches and torque converter healthy. This guide covers the traditional automatic transmission (ATF) found in most Civics, Accords, CR-Vs, and Odysseys. Following these steps carefully will prevent the common “shudder” or harsh shifting that occurs when fluid breaks down due to heat and friction.
Step 1: Gathering the Essential Supplies
What you need: 3 to 4 quarts of Genuine Honda ATF-DW1 fluid, a new 18mm aluminum crush washer, a 3/8-inch drive ratchet, a long-neck funnel, a drain pan, and safety gear (gloves and eye protection).
Instructions: Before you begin, it is vital to ensure you have the correct fluid. Honda transmissions are notoriously sensitive; using a “universal” ATF can lead to poor shift quality or internal damage over time. Always source Genuine Honda DW-1 fluid. Position your vehicle on a level surface. You may need to jack up the front of the car and secure it with jack stands to gain access to the drain plug, though some high-clearance models like the CR-V or Pilot allow for access without lifting. Ensure the engine is slightly warm—not scalding hot—to allow the fluid to flow freely while carrying away any suspended contaminants.
Pro Tip: Never use a flush machine on a Honda transmission. Honda specifically recommends against high-pressure flushes, as they can dislodge internal debris that clogs the delicate shift solenoids. Stick to the manual drain-and-fill method.
Step 2: Locating the Drain Plug and Dipstick
What you need: A flashlight and a clean rag.
Instructions: Open the hood and locate the transmission dipstick. It is usually bright yellow and situated deeper in the engine bay than the engine oil dipstick. Pull it out slightly to vent the system, which helps the fluid drain faster. Next, look under the vehicle on the passenger side of the transmission housing. You are looking for a bolt with a 3/8-inch square hole in the center. Unlike the oil pan which uses a standard hex bolt, Honda transmission drain plugs are designed to be removed using just the head of a 3/8-inch ratchet or breaker bar. Clean the area around the plug thoroughly to ensure no dirt falls into the transmission once the plug is removed.
Pro Tip: If the dipstick is difficult to reach, use a pair of long-nose pliers to gently grasp the loop, but be careful not to crack the plastic handle.
Step 3: Draining the Old Transmission Fluid
What you need: 3/8-inch ratchet, drain pan, and shop towels.
Instructions: Slide your drain pan directly under the drain plug. Insert the 3/8-inch drive ratchet head directly into the square hole of the plug. You may need to apply significant force or use a “cheater pipe” for leverage, as these plugs can be quite tight from the factory. Once the plug breaks loose, unscrew it the rest of the way by hand. Be prepared, as the fluid will exit with considerable force. Allow the fluid to drain for at least 10 to 15 minutes until it slows to a very thin drip. While it drains, observe the color and smell; it should be dark red. If it smells burnt or looks black, you may need to perform this drain-and-fill procedure three times with short drives in between to fully refresh the system.
Pro Tip: Keep the drain pan centered. As the fluid flow slows down, the stream will move closer to the hole, and you may need to reposition the pan to avoid a messy garage floor.
Step 4: Inspecting and Cleaning the Magnetic Plug
What you need: The removed drain plug and a clean microfiber towel or shop rag.
Instructions: The Honda transmission drain plug is magnetic by design. Its job is to capture microscopic metal shavings that naturally wear off the gears and clutches over time. Inspect the end of the plug carefully. It is normal to see a small amount of fine, grey “sludge” or paste on the magnet. This is standard wear and tear. However, if you find large metal chunks, needle-like shards, or excessive debris, it may indicate internal mechanical failure. Use a clean rag to wipe the magnet completely clean until the metal surface is shiny again. Removing this debris prevents it from recirculating through your new fluid and causing premature wear on the transmission’s internal valves.
Pro Tip: If the sludge is difficult to remove, a small spritz of brake cleaner on the rag will dissolve the old fluid and make the magnet easier to clean.
Step 5: Replacing the Crush Washer and Reinstalling
What you need: New 18mm aluminum crush washer and a torque wrench (optional but recommended).
Instructions: Remove the old crush washer from the drain plug. It may be flattened or “stuck” to the bolt head; use a flathead screwdriver to gently pry it off if necessary. Slide the new 18mm washer onto the plug. The crush washer is a one-time-use component that deforms to create a perfect seal; reusing an old one is the leading cause of transmission fluid leaks. Thread the plug back into the transmission housing by hand to ensure you do not cross-thread it. Once snug, use your ratchet to tighten it. The official torque specification is typically 36 lb-ft (49 N-m). Do not over-tighten, as the aluminum threads in the transmission case can strip easily.
Pro Tip: Always start the threads by hand for at least 3-4 full turns. If you feel resistance immediately, back it out and try again to avoid a multi-thousand dollar repair for a stripped transmission case.
Step 6: Refilling with Fresh Honda DW-1 Fluid
What you need: Long-neck funnel and 3-4 quarts of Honda ATF-DW1.
Instructions: Insert your long-neck funnel into the transmission dipstick tube (the hole where you pulled the yellow dipstick from earlier). Slow and steady is the key here. Pour the fresh fluid into the funnel. Most Honda passenger cars (Civic, Accord) take approximately 2.6 to 3.0 quarts for a standard drain and fill, while larger vehicles (Odyssey, Pilot) may take 3.5 to 4.0 quarts. A good rule of thumb is to measure exactly how much fluid you drained out into your pan and replace that exact amount. Pouring too quickly can cause the funnel to “burp,” sending red fluid splashing all over your hot engine components, so take your time.
Pro Tip: Use a graduated drain pan or an empty 1-gallon milk jug to measure the old fluid so you know exactly how much new fluid to add back in.
Step 7: The “Honda Method” Level Check
What you need: The transmission dipstick and a clean, lint-free cloth.
Instructions: Honda has a unique procedure for checking fluid levels that differs from most other brands. Start the engine and shift the transmission through every gear (P, R, N, D, S/L), holding each position for 3 seconds to circulate the new fluid. Turn the engine OFF. You must check the level when the engine is warm but NOT running, specifically between 60 and 90 seconds after shutting the engine down. Pull the dipstick, wipe it clean, reinsert it fully, and pull it out again. The fluid should fall between the two holes or crosshatch marks on the dipstick. If it is low, add fluid in 2-ounce increments. If it is overfilled, you must drain the excess, as overfilling causes foaming and overheating.
Pro Tip: If you check the fluid while the engine is running (as you would on a Chevy or Ford), the reading will be inaccurately low, leading you to dangerously overfill the unit.
✅ Final Checklist
- Confirm the drain plug is torqued to 36 lb-ft and the new crush washer is present.
- Verify the dipstick is fully seated in the tube to prevent moisture from entering.
- Check the ground under the vehicle for any active drips or leaks after a 10-minute test drive.
- Ensure the fluid level is exactly between the two marks on the dipstick using the “engine off” method.
- Record the mileage and date in your maintenance log for future reference.
Important Notes:
- Safety: Always wear eye protection. Transmission fluid is pressurized and can cause severe irritation. Never work under a car supported only by a floor jack; always use jack stands.
- Professional Help: If you notice “slipping” (the engine revs but the car doesn’t move) or see large metal chunks in the drain pan, stop and consult a transmission specialist, as a simple fluid change will not fix mechanical failure.
- Time and Cost: This project typically takes 45-60 minutes. The cost for fluid and the washer is usually between $40 and $70, whereas a dealership may charge $150 to $250 for the same service.
Why Honda Recommends Drain-and-Fill Over Machine Flushes
You may see independent shops offering “high-pressure transmission flushes,” but you should decline this for your Honda. Honda’s official service position favors a simple drain-and-fill method. This approach is safer for the internal components and prevents the dislodging of debris that could clog the non-serviceable internal filter. If a shop insists on using a machine, ensure it is a “passive” exchanger that does not use external pumps.

Protecting Internal Seals and Filters
Honda transmissions often contain internal mesh filters that are not accessible without removing the transmission from the car. A high-pressure flush can force metallic microscopic particles into these screens. This leads to starvation of fluid flow and eventual pump failure. Using the vehicle’s own pump to move fluid is the only approved method for circulating new oil.
- Pressure Risks: External pumps can exceed the design pressure of internal seals, causing internal leaks.
- Debris Management: Draining by gravity allows heavy metallic sediment to exit the drain port naturally.
- The 3x Method: If your fluid is extremely dark, perform three consecutive drain-and-fills with short drives in between. This is the Honda-approved way to replace nearly 100% of the fluid safely.
Maintaining Friction Material Integrity
A single drain-and-fill replaces about one-third of the total fluid volume. This is intentional. It introduces fresh detergents and friction modifiers without shocking the system. In older transmissions, replacing all the fluid at once can sometimes strip away the “glaze” on friction plates that helps them grab. A gradual replenishment allows the transmission to adapt to the new fluid’s viscosity without slipping.
Essential Tools and Materials for the Job
Before you crawl under the car, gather these specific items. Honda uses a 3/8-inch square drive for the drain plug, meaning you don’t need a socket—just the end of your ratchet or a breaker bar. Using the wrong tool can easily strip the soft aluminum plug.
The Hardware Checklist
You should never reuse a crush washer. These are one-time-use components designed to deform and create a perfect seal under torque. Reusing an old one is the number one cause of slow transmission fluid leaks that go unnoticed until the transmission begins to slip.
- Drain Plug Washer: 18mm aluminum crush washer (Part No: 90471-PX4-000).
- Fill Plug Washer: If your model has a dedicated fill bolt, it may require a 20mm washer.
- Long Funnel: A “transmission funnel” with a thin, flexible neck is required to reach the dipstick tube or fill port.
- 3/8-inch Drive Ratchet: A longer handle or a small breaker bar is helpful for the initial “crack” of the drain plug.
Locating the Fill Point
Depending on your model, you will fill the transmission through one of two places. On older models, you pour fluid directly down the dipstick tube. On newer CVTs and certain 6-speed automatics, there is a dedicated fill plug located on top of the transmission case, often labeled “ATF” or “CVT.”
- Dipstick Method: Use a narrow funnel to avoid spills. Fill slowly to allow air to burp out of the tube.
- Fill Bolt Method: This bolt is often tight. Ensure you can loosen the fill bolt before you drain the fluid. If you drain the fluid and find the fill bolt is seized, your car is stranded.
Essential Tools and Specialized Parts for Honda Maintenance
When preparing for a Honda transmission fluid change, having the right parts on hand is just as important as the fluid itself. Honda engineering is precise, and using generic components can lead to slow leaks or sub-optimal pressure within the system. To keep your gearbox happy, focus on these specific items.
The Non-Negotiable Aluminum Crush Washer
One of the most overlooked parts of Honda maintenance is the 18mm or 20mm aluminum crush washer. This small, inexpensive ring is designed to deform slightly when tightened, creating a perfect seal between the drain plug and the transmission case. Reusing an old washer is a common mistake that often results in “mystery drips” on your driveway. Always source a fresh OEM washer for every single service to ensure a leak-free seal.
OEM-Specific Fluids and Access Tools
Honda transmissions are incredibly sensitive to viscosity and friction modifiers. For traditional automatics, Honda ATF-DW1 is the gold standard, while newer models with Continuously Variable Transmissions require Honda HCF-2. Using a “universal” fluid can lead to harsh shifting or even premature belt wear in CVTs. Additionally, because Honda fill ports are often tucked away in tight spots, a long-neck, slim-profile funnel is essential. Unlike standard funnels, these reach deep into the engine bay to access the dipstick tube or fill hole without spilling fluid over your hot exhaust components.
- OEM Drain Plug Washer: Prevents slow leaks and maintains case pressure.
- Genuine Honda Fluid: Specifically formulated for the unique clutch materials in Honda gearboxes.
- Magnetic Drain Plug: Check your existing plug for metallic “fuzz”—this is a normal sign of wear, but heavy shards indicate a problem.
Maintenance Intervals and Signs of Transmission Fluid Degradation
Knowing when to change your fluid is just as vital as knowing how. While some older manuals suggested long intervals, modern driving conditions—like stop-and-go traffic and extreme heat—usually require a more proactive approach to prevent the fluid from breaking down prematurely.
Decoding the Honda Maintenance Minder
Most modern Hondas utilize the Maintenance Minder system, which monitors your driving habits to calculate fluid life. If you see a Sub-Item 3 appear on your dashboard, your car is telling you it is time for a transmission service. However, if you frequently drive in hilly terrain or tow light loads, many Honda specialists recommend a “30-60-90” rule: changing the fluid every 30,000 miles to stay ahead of degradation, regardless of what the computer says.
Physical Red Flags: Identifying Degraded Fluid
You don’t always have to wait for a dashboard light to know your fluid is failing. High-quality Honda fluid should be a bright, translucent pink or red. If you pull the dipstick and notice the fluid has turned a dark “Coca-Cola” brown or has a distinct burnt toast smell, the lubricating properties have been compromised. Other common signs of degradation include:
- The “Honda Shudder”: A brief vibration while accelerating between 20 and 40 mph.
- Delayed Engagement: A noticeable pause when shifting from Park into Drive or Reverse.
- Gear Hunting: The transmission seems indecisive or “hunts” for the correct gear on slight inclines.
Conclusion
Maintaining your Honda’s transmission doesn’t have to be a source of stress. By sticking to genuine OEM fluids like ATF-DW1 or HCF-2, replacing your crush washer every time, and staying vigilant for signs of “gear hunting” or discolored fluid, you can easily double the lifespan of your gearbox. Remember, Honda transmissions are built for longevity, but they rely entirely on the quality of the hydraulic fluid flowing through them.
Ready to get started? Your first step is to check your owner’s manual for your specific fluid type and take a quick look at your transmission dipstick to inspect the current fluid color. A small investment in OEM maintenance today will save you thousands in repair costs down the road. Keep your Honda shifting smoothly and enjoy the peace of mind that comes with a well-maintained ride!
💬 Quick Questions & Answers
Can I use generic ATF in my Honda?
No, generic fluids lack the specific friction modifiers required for Honda’s unique clutch and belt designs.
How often should Honda fluid be changed?
Most models require service every 30,000 to 60,000 miles depending on the ‘Maintenance Minder’ code.
Is a machine flush better than a drain?
No, Honda explicitly warns that high-pressure flushes can dislodge debris and damage internal seals.
What tool opens the drain plug?
A standard 3/8-inch square ratchet drive fits directly into the Honda transmission drain plug.
Do I need a new crush washer?
Yes, a new aluminum crush washer is essential for every service to ensure a proper seal.
❓ Frequently Asked Questions
What is the difference between Honda DW-1 and HCF-2 fluids?
DW-1 is the standard fluid for traditional automatic transmissions, whereas HCF-2 is specifically formulated for Honda’s Continuously Variable Transmissions (CVTs). These fluids are not interchangeable and using the wrong one can cause transmission failure.
Why does Honda advise against high-pressure transmission flushes?
Pressurized flush machines can force contaminants back into the internal solenoids and narrow fluid passages. Honda’s official service position favors the gravity drain-and-fill method to safely refresh the fluid without risking mechanical damage.
How much fluid do I usually need for a single drain and fill?
Most Honda passenger cars like the Civic, Accord, or CR-V require between 2.6 and 3.7 quarts for a standard drain and fill. Always verify the exact capacity in your owner’s manual before starting the process.
What are the symptoms of old or contaminated transmission fluid?
Common indicators include harsh shifting, delayed engagement, or a ‘slipping’ sensation during acceleration. Dark brown or black fluid with a burnt odor is a clear sign that the fluid has oxidized and lost its protective properties.
Is Honda DW-1 backward compatible with older models?
Yes, Honda DW-1 is fully backward compatible and replaces the older ATF-Z1 fluid. It provides better low-temperature performance and improved oxidation resistance for older 4-speed and 5-speed automatics.
Is it necessary to change the transmission filter during fluid service?
Most modern Hondas use internal filters that are not serviceable without a full teardown. However, some models feature an external inline or cartridge filter that should be replaced if specified in the service manual.