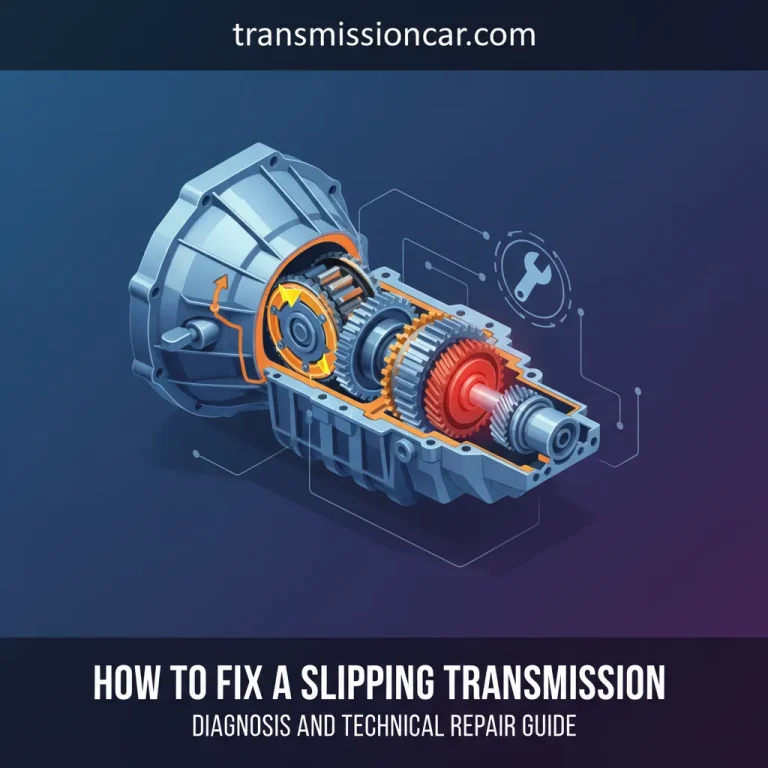
Transmission Slipping Quick Fix: 5 Low-Cost DIY Solutions
📌 Quick Summary The most effective quick fix for a slipping transmission involves correcting low fluid levels and applying high-performance stop-slip additives….
The most effective quick fix for a slipping transmission involves correcting low fluid levels and applying high-performance stop-slip additives. Additionally, addressing electronic glitches like a faulty TCM or dirty MAF sensor can often resolve shifting issues without a costly mechanical overhaul.
🎯 Key Takeaways
- Check transmission fluid levels while the engine is warm and idling for accurate readings.
- Use specialized stop-slip additives to rejuvenate seals and improve internal friction levels.
- Perform a TCM reset to clear adaptive learning errors that cause phantom slipping.
- Clean the Mass Air Flow (MAF) sensor to ensure the transmission receives correct load data.
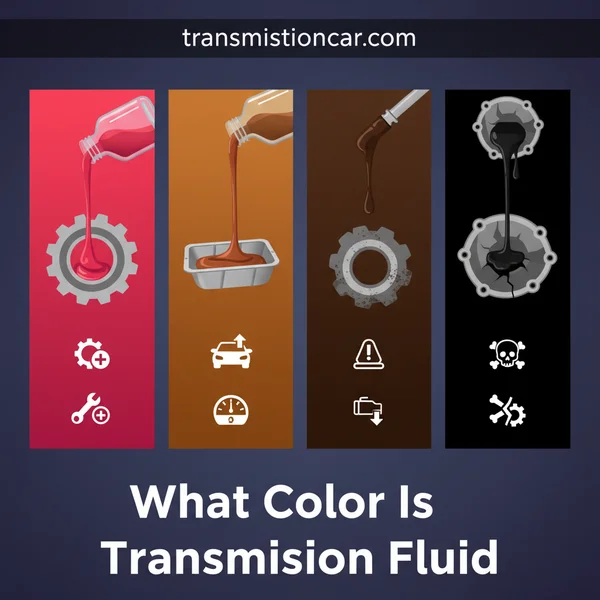
- Inspect fluid color; bright red is healthy, while dark brown indicates burnt internal components.
Most transmission slipping is not an immediate death sentence for your vehicle. It is often caused by low hydraulic pressure or incorrect data being sent to your car’s computer. Before you agree to a $3,000 professional rebuild, you should try low-cost interventions like fluid top-offs and friction-modifying additives. These simple steps can restore the internal pressure needed to keep your gears engaged.

Taking action the moment you feel a hesitation or a “flare” in RPMs is critical. Every time your transmission slips, it generates intense heat that glazes the internal clutch plates. By addressing the fluid quality and electronic sensors now, you can stop this damage. You might save your transmission for the price of a few quarts of oil and a can of specialized cleaner.
Understanding Fluid Levels and Additive Benefits
The Critical Role of Fluid Volume and Quality
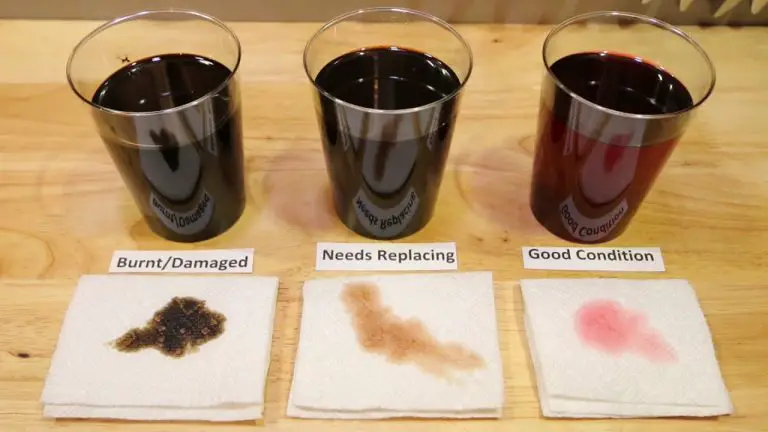
Your automatic transmission relies entirely on hydraulic pressure to hold gear sets in place. If your fluid level drops even one quart below the “Full” mark, the pump may draw in air. This creates bubbles in the fluid, known as aeration, which prevents the clutches from clamping tightly. You should always check your fluid while the engine is running and the transmission is at operating temperature. Look for a bright red color and a semi-sweet smell. If the fluid is dark brown or smells like burnt toast, it has lost its ability to provide necessary friction.

- Low Fluid: Causes the pump to lose prime, leading to delayed engagement and slipping.
- Worn Fluid: Loses its viscosity, meaning it cannot maintain the pressure required for heavy loads.
- Fluid Condition: If you see silver metallic flakes on the dipstick, internal wear is already significant.
Stop-Slip Additives: Friction Modifiers in a Bottle
If your fluid level is correct but the slipping persists, a high-viscosity stop-slip additive is your best DIY tool. Products like Lucas Transmission Fix or Sea Foam Trans Tune work by conditioning old, hardened seals. These additives contain “tackifiers” that increase the grip between clutch plates and restore the chemical balance of the fluid. They are designed to thicken the fluid just enough to stop minor leaks and increase line pressure without clogging narrow internal passages.
- Seal Swelling: Additives soften O-rings to stop internal pressure bleeds.
- Viscosity Boost: Provides a thicker film of oil to help worn gears mesh.
- Cost Efficiency: A single $15 bottle can often provide an immediate, noticeable improvement in shift quality.
Transmission Slipping Made Easy: Your Essential Action Plan
A slipping transmission is one of the most stressful experiences a car owner can face. You step on the gas, the engine revs loudly, but the vehicle hesitates or fails to accelerate at the same pace. This guide is designed to provide you with a comprehensive set of “quick fix” strategies that address the most common causes of slipping, such as low fluid pressure, worn-out additives, or minor electrical glitches. By following these steps, you can potentially restore driveability and avoid a multi-thousand dollar rebuild. However, keep in mind that these are maintenance-based solutions; if your internal clutch packs are completely disintegrated, these steps will buy you time rather than provide a permanent cure.
Step 1: Check Fluid Levels and Health
What you need: A lint-free white rag or paper towel, a flat parking surface, and your vehicle’s owner’s manual.
Instructions: Start by parking your vehicle on a level surface. With the engine running and at operating temperature (usually after a 10-minute drive), pull the transmission dipstick out. Wipe it clean, reinsert it fully, and pull it out again. Check the level against the “Hot” marks. More importantly, observe the fluid’s color and smell. Healthy fluid is bright pink or red. If it is dark brown or black and smells like burnt toast, the internal clutches are likely burning. If the fluid level is low, it prevents the hydraulic pressure needed to engage gears, leading directly to slipping. Note that some modern “sealed” transmissions require checking a plug underneath the car while leveled on jack stands.
Pro Tip: Never check the fluid while the engine is cold if you want an accurate reading for a slipping issue. Heat causes the fluid to expand, and the transmission’s hydraulic circuits must be primed by the pump (running engine) to show the true level.
Step 2: Top Off with the Correct ATF
What you need: A long-neck funnel and the specific Automatic Transmission Fluid (ATF) recommended by your manufacturer (e.g., Dexron VI, Mercon V, or ATF+4).
Instructions: If your fluid was low in Step 1, you must add more immediately. Using a funnel, pour the fluid into the dipstick tube in small increments—usually half a quart at a time. After adding, wait a minute for the fluid to drain down the tube, then cycle the gear shifter through every position (P-R-N-D-L) while holding the brake. This ensures the new fluid circulates through the valve body. Re-check the dipstick. Repeat until the level is exactly between the “Hot” marks. Be extremely careful not to overfill, as this causes aeration (bubbles), which reduces hydraulic pressure and actually makes slipping worse.
Pro Tip: Using the wrong type of fluid is a recipe for disaster. Different fluids have different friction modifiers. Using a “Universal” fluid in a car that requires a highly specific synthetic can cause the clutches to slip even more.
Step 3: Administer a Friction-Modifying Additive
What you need: A bottle of specialized transmission “Stop-Slip” or “Conditioner” (such as Lucas Transmission Fix or Sea Foam Trans Tune).
Instructions: If your fluid level is correct but the transmission is still slipping, an additive can provide a temporary chemical fix. These products contain high-viscosity index improvers and seal conditioners. They work by increasing the “tackiness” of the fluid, helping worn clutch plates grip better, and softening hardened rubber seals that may be leaking internally. To add it, you may need to drain about 12-20 ounces of existing fluid first to make room. Pour the additive into the dipstick tube. It is a thick, honey-like substance, so it may take time to flow down. Once added, drive the vehicle gently for 15-20 miles to allow the chemicals to permeate the system.
Pro Tip: Additives are best used when the slipping is “mild” or happens only when the car is cold. If the car barely moves, an additive is unlikely to provide a miracle cure, but it is a low-cost “last resort” before a shop visit.
Step 4: Perform a “Drain and Fill” (Not a Flush)
What you need: A socket set, a large drain pan, a new drain plug washer (if applicable), and 4-6 quarts of fresh ATF.
Instructions: If the fluid is dirty or old, a partial fluid exchange can restore hydraulic integrity. Locate the drain plug on the bottom of the transmission pan. Place your pan underneath and unscrew the plug. You will typically only get about 30% to 50% of the total fluid out, as the rest stays in the torque converter. Once the flow stops, replace the plug and tighten it to the torque specification (usually 20-30 ft-lbs). Refill the transmission with the exact amount you drained. We suggest a “drain and fill” over a high-pressure machine “flush” because flushes can dislodge debris that clogs the delicate valve body in older, slipping transmissions.
Pro Tip: Measure exactly how much fluid comes out using a graduated container. This takes the guesswork out of how much you need to put back in to reach the correct level.
Step 5: Replace the Transmission Filter and Pan Gasket
What you need: A transmission filter kit, a new pan gasket, a torque wrench, and brake cleaner.
Instructions: If a drain and fill didn’t help, the internal filter may be clogged with friction material, starving the pump of fluid. Loosen the bolts around the transmission pan, leaving two on one side partially attached so the pan tilts and drains the fluid controlled. Remove the pan entirely. Pull the old filter off—be prepared for more fluid to splash down. Clean the bottom of the pan and the magnet (which collects metal shavings) using brake cleaner. Install the new filter, ensuring the O-ring is seated correctly. Apply the new gasket to the pan and bolt it back onto the transmission. Tighten the bolts in a criss-cross pattern to prevent warping the pan flange.
Pro Tip: Inspect the magnet in the pan. A fine grey “sludge” is normal wear, but if you see large silver flakes or “chunks” of metal, the transmission has suffered internal mechanical failure that no quick fix can resolve.
Step 6: Reset the Transmission Control Module (TCM)
What you need: An OBDII scan tool or a basic wrench to disconnect the battery.
Instructions: Modern transmissions use “Adaptive Learning” to adjust shift points based on your driving style and clutch wear. Sometimes, the computer “learns” bad habits or fails to adjust to thinning fluid. You can perform a “soft reset” by disconnecting the negative battery terminal for 30 minutes, which clears the TCM’s long-term memory. Alternatively, use an OBDII scanner with a “TCM Reset” or “Transmission Adaptives Clear” function. After resetting, drive the car at various speeds and throttle positions. The computer will enter a “relearn” mode, where it re-calibrates the solenoid pressures to match the current state of the internal hardware, often smoothing out slips.
Pro Tip: During the first 10 miles after a reset, the shifts may feel slightly abrupt. This is normal as the computer fine-tunes the shift timing. Avoid heavy towing or aggressive racing during this period.
Step 7: Verify Engine Sensor Health (MAF and TPS)
What you need: Mass Air Flow (MAF) sensor cleaner and a screwdriver.
Instructions: Surprisingly, a transmission might slip because the engine isn’t reporting the correct load to the computer. If the Mass Air Flow (MAF) sensor or Throttle Position Sensor (TPS) is dirty, the computer may not command enough line pressure in the transmission, causing the clutches to slide rather than lock. Locate your MAF sensor (near the air filter box) and spray it with specialized MAF cleaner. Do not touch the delicate wires inside. Also, check for any “Check Engine” lights related to the engine. Fixing an engine vacuum leak or a faulty sensor can often “miraculously” fix a transmission that seemed to be slipping.
Pro Tip: If your RPMs are fluctuating while the car is at a steady speed, it could be the Torque Converter Clutch (TCC) slipping. This is often an electrical or sensor-related issue rather than a mechanical gear failure.
✅ Final Checklist
- Verify that the fluid level is exactly at the “Full Hot” mark while the engine is idling.
- Ensure there are no active leaks coming from the transmission pan gasket or drain plug.
- Confirm that the “Check Engine” or “Transmission” warning lights on the dashboard are extinguished.
- Take a 15-minute test drive involving both stop-and-go traffic and highway speeds to ensure all gears engage.
- Check the fluid color one last time after the test drive to ensure no new burnt smell has developed.
Important Notes:
- Safety Warning: Always wear eye protection and gloves when handling ATF, as it is a skin irritant and highly flammable. Never work under a vehicle supported only by a floor jack; always use jack stands.
- When to see a pro: If you find large metal chunks in the pan, or if the car does not move at all in “Drive” or “Reverse” despite full fluid levels, the unit likely requires a professional rebuild.
- Estimated Time: 1 to 4 hours depending on the steps taken.
- Estimated Cost: $20 (fluid top-off) to $150 (filter, gasket, and full fluid exchange).
Electronic Components and Sensor Impact on Shifting
Resetting the Transmission Control Module (TCM)
Modern transmissions are “adaptive,” meaning the computer learns your driving habits and adjusts shift timing accordingly. Over time, the Transmission Control Module (TCM) might store “learned” values that no longer match the actual mechanical state of the hardware. This results in sloppy shifts that feel like slipping. You can often perform a “soft reset” by turning the ignition to the “On” position without starting the engine, then holding the gas pedal to the floor for 30 seconds. This forces the computer to revert to factory-default shift maps.

- Software Glitches: A reset clears adaptive memory and re-syncs the engine and transmission.
- Immediate Feedback: You will often feel firmer, more predictable shifts immediately after a reset.
- DIY Friendly: This fix requires zero tools and takes less than two minutes to complete.
Cleaning the Mass Air Flow (MAF) Sensor
It may seem unrelated, but a dirty Mass Air Flow (MAF) sensor is a common cause of “phantom” transmission slipping. The computer uses data from the MAF sensor to calculate engine load. If the sensor is dirty, it sends a signal that the engine is under less load than it actually is. Consequently, the computer lowers the transmission line pressure, causing the clutches to slide rather than grab. Cleaning this sensor with a $10 can of specialized MAF cleaner can instantly firm up your shifts and improve throttle response.
- Locate the MAF sensor inside the air intake duct near the air filter box.
- Unplug the electrical connector and remove the sensor carefully.
- Spray the internal wire or plate with MAF cleaner (never use brake cleaner or carb cleaner).
- Let the sensor air dry completely for 10 minutes before reinstalling.
Stop-Slip Additives vs. Full Transmission Flushes: Which is Right for You?
When your car starts hesitating between gears, you usually face two immediate choices: pour in a bottle of stop-slip additive or perform a complete transmission fluid flush. Both aim to solve the same problem, but they work in very different ways. Understanding the chemistry behind these options can save you from making a costly mistake on a high-mileage vehicle.
The Quick Fix Power of Additives
Transmission stop-slip additives are chemical cocktails designed to improve the friction characteristics of old fluid. They often contain seal conditioners that swell hardened rubber seals, helping to stop internal leaks that cause pressure loss. If your transmission is slipping because of worn-out viscosity or minor internal pressure drops, an additive is often the fastest, most budget-friendly remedy.
- Best for: Older vehicles with minor slipping or “morning sickness” (delayed engagement when cold).
- Pros: Extremely low cost (usually under $20), no special tools required, and provides immediate results.
- Cons: It is often a temporary “band-aid” fix that doesn’t remove contaminants from the system.
The Long-Term Benefit of a Full Flush
A full transmission flush involves replacing every drop of old fluid with fresh, high-quality lubricant. Over time, transmission fluid loses its ability to manage heat and hold particles in suspension. A flush “resets the clock” by removing oxidized fluid and metal shavings that can clog the valve body. However, be cautious with very high-mileage cars; sometimes, the grit in old fluid is the only thing providing enough friction for worn clutch plates to grab.
- Best for: Vehicles with dirty, dark fluid that haven’t reached the point of mechanical failure.
- Pros: Restores cooling efficiency and provides the best protection for internal components.
- Cons: More expensive than additives and requires more labor or professional equipment.
Cost-Benefit Analysis: DIY Fixes vs. Professional Rebuilds
The gap between a DIY transmission fix and a professional shop visit is massive. While a bottle of additive or a new filter might cost you a Saturday afternoon and $50, a professional transmission rebuild can easily exceed $3,000. Deciding whether to keep “patching” the problem or bite the bullet for a major repair depends on the current health of your gears and the value of the vehicle.
The Wallet-Friendly DIY Approach
Most transmission slipping issues are caused by low fluid levels, clogged filters, or degraded fluid. Addressing these three factors yourself covers about 70% of common shifting problems. If your DIY efforts restore smooth shifting, you have potentially saved thousands of dollars and extended the life of your car by several years. It is almost always worth trying the low-cost DIY route first before seeking a professional diagnosis.
- DIY Cost: Typically $15 to $100 depending on the fluid and filter kit used.
- Success Rate: High for maintenance-related slipping; low for broken internal hard parts.
- Risk: Minimal, provided you use the correct manufacturer-specified fluid (e.g., Dexron VI, Mercon V, etc.).
When the Quick Fix Isn’t Enough
There is a point of no return where DIY fixes will no longer help. If you find large metal chunks in your transmission pan or if the fluid smells like burnt toast, the friction material on your clutch plates is likely gone. In these cases, additives may only work for a few days—or not at all. If the car enters “limp mode” (stuck in one gear) or makes loud grinding noises, your budget should shift toward a professional rebuild or a used transmission swap.
Conclusion
Dealing with a transmission slip doesn’t always mean a trip to the scrap yard or a massive repair bill. By focusing on fluid levels, quality additives, and clean filters, you can often restore your vehicle’s performance for a fraction of the cost of a professional overhaul. These low-cost solutions are the best first line of defense for any DIYer looking to keep their car on the road longer.
Your next steps should be simple: check your transmission dipstick today, look for signs of leaks under your driveway, and don’t ignore the early warning signs of a rough shift. A little bit of proactive maintenance now can prevent a total transmission failure later. You’ve got this—grab some fluid and get back to smooth driving!
💬 Quick Questions & Answers
Can low fluid cause transmission slipping?
Yes, insufficient fluid prevents the necessary hydraulic pressure required to engage gears, leading to slipping.
Do stop-slip additives actually work?
They provide a temporary fix by swelling worn seals and increasing friction, often buying months of driving time.
Can a dirty MAF sensor cause slipping?
Yes, an inaccurate MAF sensor sends incorrect engine load data, which can cause the transmission to shift poorly.
What color should healthy transmission fluid be?
Healthy fluid is bright red; if the fluid appears dark brown or black, it is likely burnt.
Is a TCM reset safe for my vehicle?
Yes, resetting the Transmission Control Module simply clears stored driving habits and forces the computer to recalibrate shifting.
❓ Frequently Asked Questions
How long will a stop-slip additive last in a slipping transmission?
While not a permanent solution, stop-slip additives can typically extend the life of a transmission by 6 to 12 months. Their effectiveness depends on the severity of the internal wear and how much friction material remains on the clutches.
Will adding more fluid fix the slipping issue immediately?
If the slip is caused by low hydraulic pressure due to a leak, adding fluid can provide immediate improvement. However, you must identify and repair the source of the leak to prevent the problem from recurring quickly.
Can I continue to drive my car if the transmission is slipping?
It is highly discouraged, as slipping creates excessive heat that rapidly destroys internal components. You should attempt a quick fix or visit a mechanic immediately to avoid a total transmission failure and a higher repair bill.
What is the difference between a gear slip and a hard shift?
Slipping occurs when the engine RPMs rise but the vehicle fails to accelerate properly, whereas a hard shift is a violent engagement of gears. Both can often be mitigated by checking fluid quality and cleaning electronic sensors.
When is a quick fix insufficient for a slipping transmission?
If you find metal shavings in the transmission pan or the fluid has a strong burnt odor, the internal gears or clutches are likely physically damaged. In these scenarios, additives and software resets will not restore functionality.
How does cold weather affect an aging transmission?
Cold temperatures increase fluid viscosity, making it harder for a worn transmission to build pressure. Letting the vehicle warm up for several minutes or switching to a high-quality synthetic fluid can help reduce cold-start slipping.