Cv Axle Not Seated into Transmission: Symptoms, Risks, and Expert Solutions
When the CV Axle isn’t seated correctly into the transmission, it can lead to significant vehicle issues. It’s crucial to recognize the…
When the CV Axle isn’t seated correctly into the transmission, it can lead to significant vehicle issues. It’s crucial to recognize the symptoms, such as unusual noises or a visible gap, and ensure correct installation to maintain optimal vehicle performance.
If your CV (Constant Velocity) axle is not seated properly into the transmission, it can lead to a variety of problems, including fluid leaks, poor vehicle performance, and potential damage to the transmission or the axle itself.
In the intricate dance of automotive mechanics, every component plays a pivotal role. Among these, the CV (Constant Velocity) Axle stands out as a linchpin, ensuring the seamless transfer of power from the engine to the wheels, allowing us to navigate the roads with grace and precision.
Yet, like any dance, a single misstep can disrupt the entire performance. One such misstep is the CV Axle not being seated correctly into the transmission.
Imagine driving and suddenly feeling unusual vibrations or hearing unsettling noises emanating from beneath the vehicle. These could be tell-tale signs that the CV Axle is not seated properly, a situation that can lead to severe mechanical issues compromised driving safety, and potential damage to the transmission. It’s akin to a gear in a clock not fitting just right, causing the entire mechanism to falter.
Pushing a new CV Axle into Transmission – pro tip!
Symptoms of a CV Axle Not Seated Properly
The CV Axle, as we’ve established, plays a pivotal role in the seamless operation of a vehicle. But what happens when it’s not seated correctly? Much like a misaligned cog in a clock, even a slight misalignment can disrupt the entire system. Let’s delve into the telltale signs that indicate a CV Axle might not be seated properly.
Recognizing the Signs
Unusual Noises During Turns:

One of the most common and noticeable symptoms is a loud clicking or popping noise when making turns. This sound is a result of the CV joint struggling due to the misalignment, causing it to click against the housing.
Vibration During Acceleration:

If you feel a distinct vibration, especially during acceleration, it could be a sign that the CV Axle isn’t seated correctly. This vibration is caused by the imbalance created by the misaligned axle.
Visible Signs of Wear or Damage on the CV Axle:

A regular visual inspection can be quite revealing. If you notice excessive grease splattered around the inside of the wheel or on the driveway, it could indicate a torn boot, which might lead to the axle not sitting correctly. Additionally, any visible damage or excessive wear on the axle itself is a clear red flag.
The Gap Between CV Axle and Transmission
A clear indication of a CV Axle not seated properly is the presence of a visible gap between the axle and the transmission. This gap can lead to:
Leakage of Transmission Fluid:
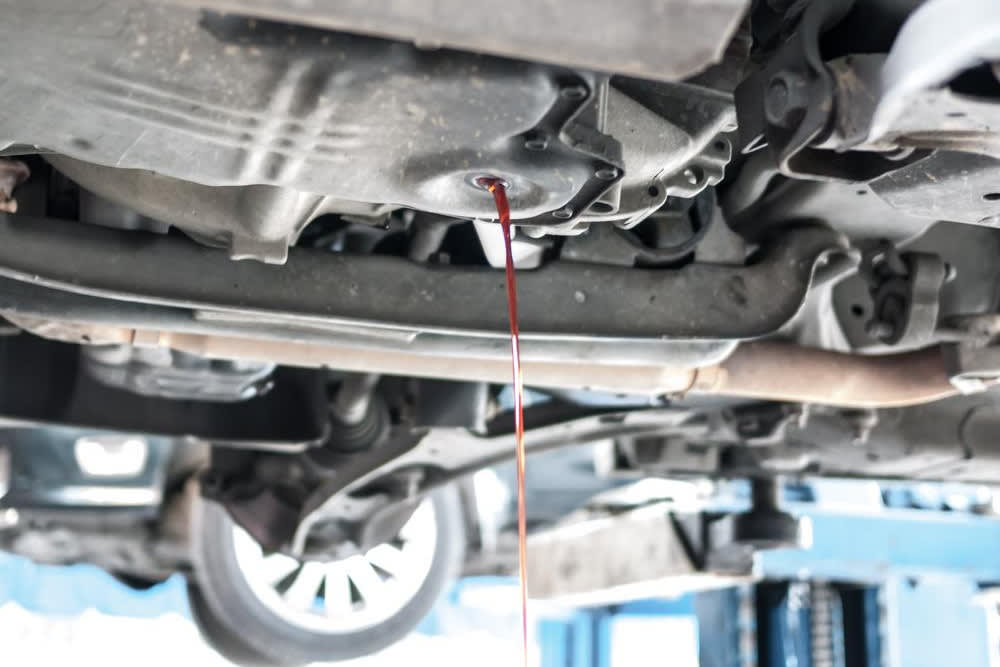
The gap can allow transmission fluid to leak, which not only reduces the efficiency of the transmission but can also lead to potential damage if left unchecked.
Inefficient Power Transfer:
The gap can disrupt the seamless power transfer from the engine to the wheels, leading to reduced vehicle performance.
Potential Damage to Other Components:
Over time, this gap can lead to wear and tear on other nearby components, escalating repair costs.
- You Can See: Transmission Problems After Cv Joint Replacement
Can You Put a CV Axle in Wrong?
The CV Axle, with its intricate design and pivotal role in a vehicle’s operation, requires meticulous attention during installation. But mistakes happen, even to the best of us. Let’s explore the standard errors associated with CV Axle installation and the repercussions of these oversights.
How to Tell if CV Axle is in All the Way
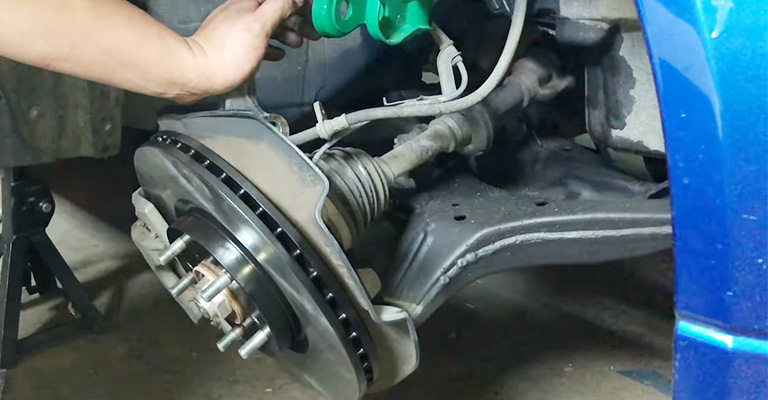
Physical Inspection: Begin with a visual check. If the CV Axle is seated correctly, it should fit snugly without any visible gaps. An improperly seated axle might show a clear separation from the transmission.
Listen for Sounds: An improperly seated CV Axle can produce distinct sounds, especially during acceleration or turns. If you hear unusual noises shortly after an axle replacement or service, it’s a sign to recheck the installation.
Check for Leaks: Transmission fluid leaks around the area where the CV Axle connects to the transmission can indicate a seating problem.
Consequences of Improper Installation
Potential Damage to the Transmission: An improperly seated CV Axle can strain the transmission, leading to wear and tear and, in severe cases, significant damage.
Reduced Vehicle Lifespan and Efficiency: The misalignment can cause other components to wear out prematurely, reducing the overall lifespan of the vehicle and its operational efficiency.
Safety Hazards: Driving with a CV Axle not seated correctly can be dangerous. The axle could dislodge, leading to a loss of power or control, especially at high speeds.
Increased Repair Costs: Over time, what might seem like a minor seating issue can escalate into significant repair costs, significantly if it affects the transmission or other vital components.
Ensuring Your CV Axle is Seated Correctly
The CV Axle, being a cornerstone of your vehicle’s mobility, demands precision during its installation. A misstep can lead to a cascade of issues, from reduced efficiency to potential safety hazards. Let’s navigate the process of ensuring your CV Axle is seated correctly, ensuring a smooth ride ahead.
Pre-installation Checks
Right Type for the Vehicle: Before diving into the installation, ensure that the CV Axle is the correct type and fit for your vehicle. Compatibility is crucial.
Inspect for Damage: Examine the CV Axle for any visible signs of wear, damage, or manufacturing defects. Starting with a compromised component can lead to future issues.
Gather Necessary Tools: Having the right tools at hand will streamline the process. This might include a jack, jack stands, socket set, and other vehicle-specific tools.
The Installation Process
Lift the Vehicle: Using a jack, safely lift the vehicle and secure it with jack stands.
Remove the Old CV Axle: If you’re replacing an old axle, carefully remove it, ensuring not to damage surrounding components.
Align the New CV Axle: Position the new CV Axle, ensuring it aligns perfectly with the transmission. This step is crucial; an improper alignment can lead to the axle not seating correctly.
Secure the CV Axle: Once aligned, push the CV Axle into place until it seats fully into the transmission. You should feel it lock into position.
Reassemble: Reattach any components that were removed during the process, such as the wheel, brake assembly, or others.
Lower the Vehicle: Once everything is in place and double-checked, safely lower the vehicle.
Post-installation Verification
Test Drive: Before hitting the road, take a short test drive. Listen for any unusual sounds and pay attention to the vehicle’s handling, especially during turns.
Visual Inspection: After the test drive, do another visual check to ensure no visible gaps remain between the CV Axle and the transmission.
Check for Leaks: Ensure there’s no leakage of transmission fluid around the area where the CV Axle connects to the transmission.
Credit: hondatheotherside.com
FAQs
Why is there a gap between my CV Axle and transmission?
A gap between the CV Axle and transmission can arise due to several reasons:
Improper Installation: If the CV Axle isn’t aligned correctly during installation, it might not seat fully, leading to a visible gap.
Wear and Tear: Over time, components can wear out, leading to misalignments.
Damaged Components: Any damage to the CV Axle or the transmission housing can prevent a snug fit.
How can I tell if my CV Axle is seated all the way?
Several indicators can help:
Visual Inspection: A direct look can often reveal if the axle is seated properly. There shouldn’t be any visible gaps.
Unusual Noises: Clicking or popping sounds, especially during turns, can indicate an improperly seated axle.
Vibration: If you feel vibrations during acceleration, it might be due to the CV Axle not being seated correctly.
What are the risks of driving with a CV Axle not seated properly?
Driving with a misaligned CV Axle can lead to:
Transmission Damage: The gap can strain the transmission, leading to potential damage.
Reduced Efficiency: Power transfer might be inefficient, affecting vehicle performance.
Safety Concerns: In extreme cases, the axle could dislodge, leading to loss of control.
Can a wrongly installed CV Axle damage the transmission?
Absolutely. An improperly seated CV Axle can lead to:
Fluid Leaks: The gap can allow transmission fluid to escape.
The strain on the Transmission: The misalignment can put undue stress on the transmission, leading to wear and potential damage.
How often should I check the seating of my CV Axle?
Regular maintenance is key:
Routine Checks: It’s advisable to inspect the CV Axle during regular vehicle check-ups, at least once a year.
After Service or Replacement: Always check the seating after any service or replacement of the CV Axle or related components.
Conclusion
As we steer towards the end of our journey exploring the intricacies of the CV Axle and its symbiotic relationship with the transmission, it’s essential to revisit and underscore the key takeaways.
The CV Axle is not just a component; it’s the lifeline that transfers the engine’s power to the wheels, ensuring your vehicle moves with grace, power, and efficiency. Its seamless interaction with the transmission is paramount for optimal vehicle performance. A misstep, a gap, or improper seating can lead to a cascade of issues, from reduced efficiency to potential safety hazards.
Regular maintenance, timely checks, and a keen ear for unusual sounds can go a long way in ensuring the longevity and safety of your vehicle. An improperly seated CV Axle is not just a mechanical oversight; it’s a ticking time bomb that can lead to costly repairs and potential risks.
For those who’ve ventured into the DIY world of automotive repairs, remember the importance of precision and meticulousness. And for those who rely on professionals, understanding the signs and symptoms ensures you’re never caught off guard.
See Also:
- Toyota Corolla Engine Replacement Cost
- The speed Sensor Broke off in the Transmission
- How to Check Transmission Fluid on a 2007 Dodge Charger