6L80E Transmission Pan Torque Specs – A Comprehensive Guide (2023)
6L80 transmission pan, it’s crucial to adhere to the specified torque specs to ensure optimal performance and prevent leaks. Typically, bolts should…
6L80 transmission pan, it’s crucial to adhere to the specified torque specs to ensure optimal performance and prevent leaks. Typically, bolts should be torqued to a range of 18-20 ft-lbs, following the correct sequence. Always refer to the manufacturer’s manual for precise specifications.
The 6L80 transmission is not just another component in the automotive world; it’s a testament to engineering excellence. Born from years of research and development, this transmission stands as a beacon of reliability and efficiency.
Over the years, it has found its way into numerous vehicles, earning accolades for its seamless performance and durability.
| Bolt Position | Bolt Size | Thread Type | Material | Torque Specs |
| Center | M10 | Fine | Stainless Steel | 10 ft-lbs |
| Perimeter (Front) | M8 | Coarse | Alloy Steel | 8 ft-lbs |
| Perimeter (Rear) | M8 | Coarse | Alloy Steel | 8 ft-lbs |
| Reinforcement | M12 | Fine | Carbon Steel | 12 ft-lbs |
| Drain Plug | M14 | Fine | Stainless Steel | 15 ft-lbs |
Easy Pan Removal! 6L80E Transmission
Importance of Correct Torque Specs for Transmission Pans
Every mechanic knows the significance of details. When it comes to the 6L80 transmission, the torque specs for the transmission pan are one such detail that can’t be overlooked.
Ensuring the correct torque is not just about preventing leaks; it’s about guaranteeing the transmission’s longevity and optimal performance. It’s a small step that plays a pivotal role in the grand scheme of vehicle maintenance.
- You Can See: Importance of Regular Transmission Checks
Understanding the 6L80 Transmission Pan Torque Specs
Why Torque Specs are Crucial for the 6L80 Transmission Pan In the realm of automotive mechanics, torque isn’t just about force; it’s about precision. For the 6L80 transmission pan, achieving the right torque is akin to finding the perfect balance.
It ensures that the pan is neither too tight, risking damage, nor too loose, leading to potential leaks. Proper torquing ensures that the transmission fluid remains sealed, maintaining the right pressure for optimal transmission function.
The Dangers of Over-Torquing and Under-Torquing
Imagine driving with an imbalanced wheel; the ride is neither smooth nor safe. Similarly, over-torquing or under-torquing the transmission pan bolts can lead to imbalances in the transmission system.
Over-torquing can stress the bolts, leading to potential breakage or warping of the pan. On the other hand, under-torquing might not seal the pan adequately, leading to fluid leaks. Both scenarios are undesirable and can lead to costly repairs and reduced transmission lifespan.

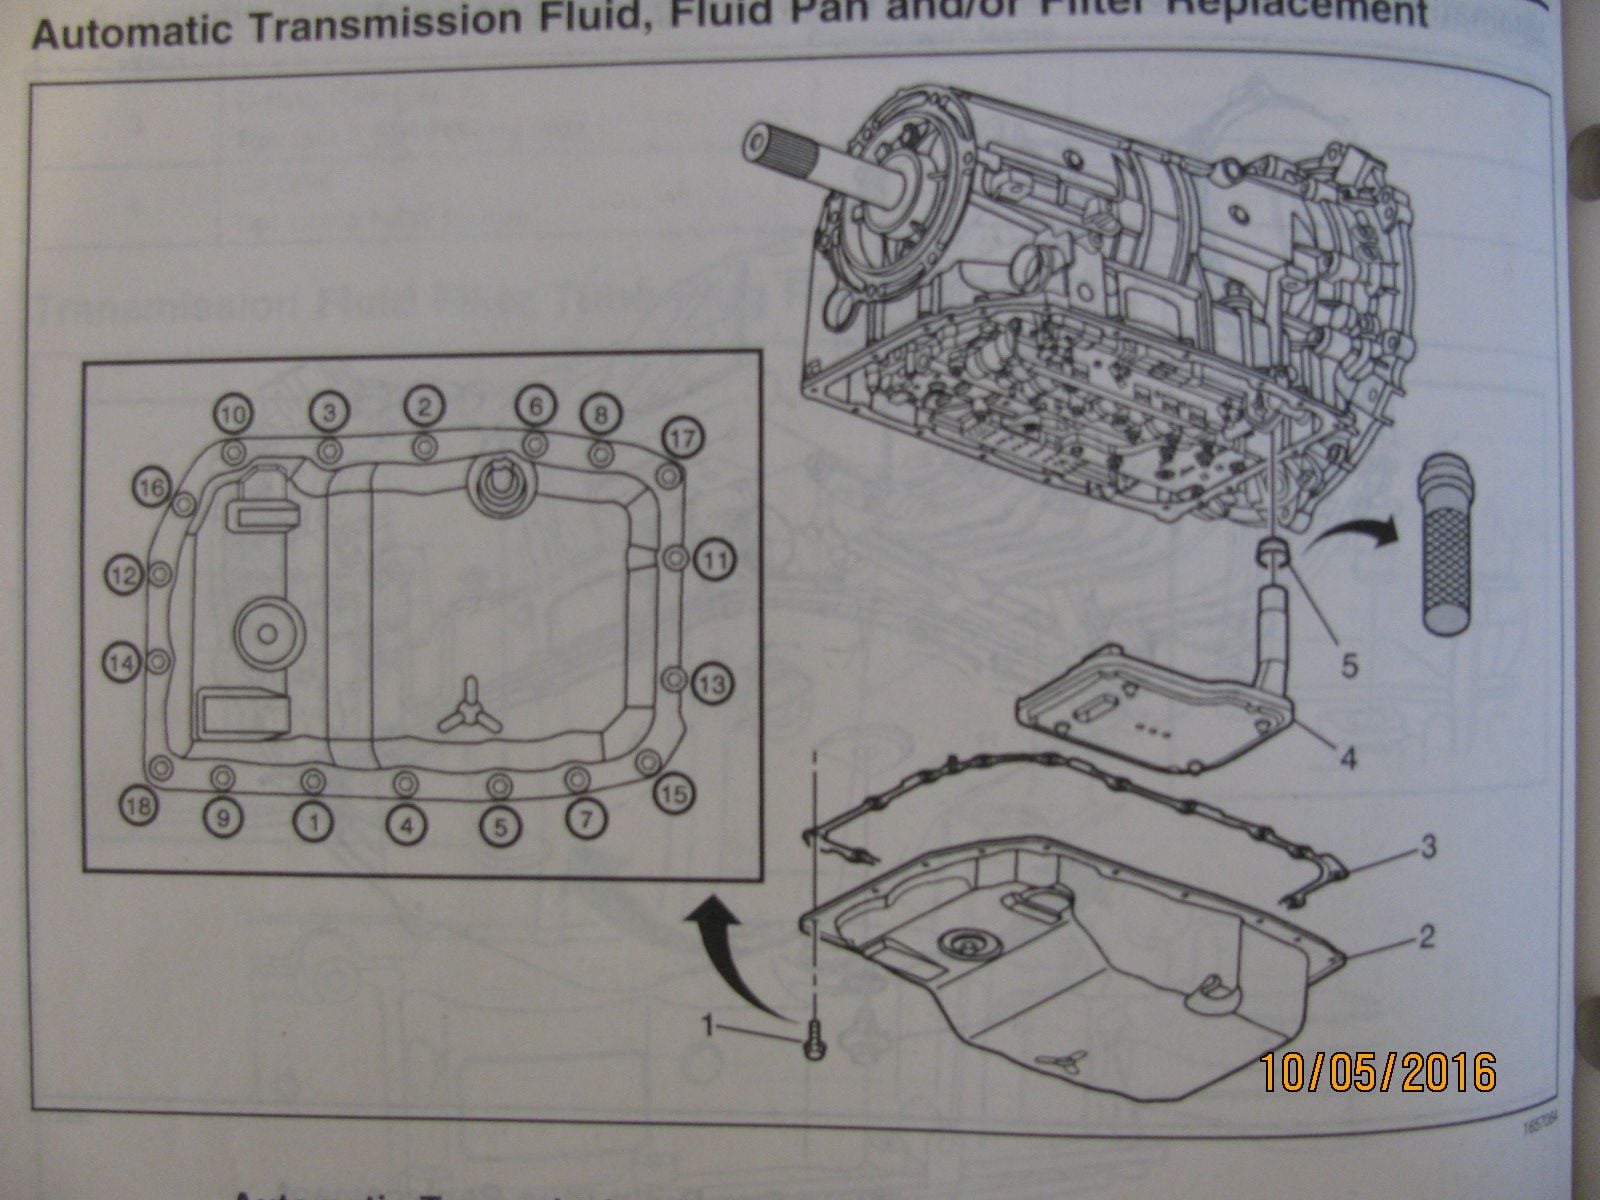
6L80 Pan Torque Sequence: Step-by-Step
The Science Behind the Sequence
The 6L80 transmission pan torque sequence isn’t just a set of instructions; it’s a culmination of engineering insights. The transmission pan, while seemingly simple, plays a pivotal role in maintaining the integrity of the transmission system.
The sequence ensures that the pan is uniformly seated against the transmission, preventing any gaps or misalignments that could lead to leaks or pressure imbalances.
The Correct Sequence to Follow
Achieving the perfect seal requires precision, patience, and adherence to the specified sequence. Here’s a detailed step-by-step guide:
Preparation: Before starting, ensure that both the transmission and the pan surfaces are clean and free from any old gasket material or debris. This ensures a flush fit.
Hand Tightening: Begin by placing the gasket on the transmission pan. Hand-tighten the bolts, starting with the centermost ones. This central starting point ensures that the pan sits evenly from the get-go.
Crisscross Pattern: As you move from the center, follow a crisscross or star pattern. This approach ensures that pressure is distributed evenly across the pan, preventing any warping or bending.
Partial Torquing: Once all bolts are hand-tightened, use a torque wrench to partially torque them, still adhering to the crisscross pattern. This step-by-step tightening ensures that no area of the pan is over-stressed.
Final Torquing: After the initial pass, go over each bolt again, this time applying the full recommended torque. Ensure that you maintain the specified torque value to prevent over-tightening.
Common Mistakes and Their Implications
Skipping the Sequence: Not following the crisscross pattern can lead to uneven pressure, causing the pan to warp or not sit flush, leading to potential leaks.
Over-Torquing: Applying too much torque can strip the threads or even crack the pan, leading to immediate or future leaks.
Under-Torquing: Not applying enough torque can result in the pan not sealing properly, leading to fluid leaks and potential contamination.
Tips for Perfect Torquing
Always use a calibrated torque wrench.
If unsure, always refer to the manufacturer’s manual for precise torque specifications.
Periodically check the torque specs, especially after any maintenance involving the transmission pan.
6L80 Transmission Pan Bolt Size and Its Significance
The Role of Bolts in Transmission Pans
Bolts are the unsung heroes of the transmission system. While they might seem like simple fasteners, they play a crucial role in ensuring the transmission pan is securely attached, maintaining the integrity of the seal. The size and type of bolt used can significantly impact the effectiveness of this seal.
Different Bolt Sizes and Their Roles
The 6L80 transmission pan utilizes bolts of specific sizes, each designed to provide optimal sealing and security. Here’s a detailed breakdown:
How Bolt Size Affects Torque Specs
Bolt size and torque specs go hand in hand. The diameter and length of a bolt determine how much torque it can handle. Larger bolts, with their increased surface area, can typically handle more torque, ensuring a tighter seal.
Conversely, smaller bolts require less torque, as over-torquing them can lead to stripped threads or even breakage.
The Importance of Using the Right Bolt
Using the wrong bolt size or type can have detrimental effects:
Misalignment: The wrong bolt can lead to the pan not sitting correctly, leading to potential leaks.
Damaged Threads: A bolt that’s too large can damage the threads, making future maintenance challenging.
Compromised Seal: Using a bolt that’s too small might not provide the necessary pressure to maintain the seal, leading to leaks.
Tips for Bolt Maintenance
Regularly inspect bolts for signs of wear or corrosion.
Always replace bolts with manufacturer-recommended parts.
If a bolt feels too tight or too loose during maintenance, it’s a sign that it might need replacement.
- You Can See: Importance of Regular Bolt Checks
How to Tighten Oil Pan Bolts: A Practical Guide
The Art and Science of Tightening
Tightening oil pan bolts might seem straightforward, but it’s a blend of art and science. Achieving the right torque ensures the longevity of the transmission system and prevents potential issues down the line.
Tools Required
Before diving into the tightening process, it’s essential to have the right tools on hand:
Torque Wrench: This tool is indispensable. It allows for precise application of force, ensuring you achieve the recommended torque specs.
Socket Set: A comprehensive set ensures you can handle any bolt size. Ensure they’re in good condition to prevent stripping the bolt heads.
Gloves: Protect your hands and ensure a better grip.
Rag or Cloth: For cleaning any residue or oil.
[Product Recommendation: The best toolset for tightening oil pan bolts.]
Step-by-Step Tightening Procedure
Clean and Inspect: Before starting, clean the transmission pan and its mounting area. Ensure there’s no old gasket material, debris, or oil residue. This ensures a perfect seal.
Position the Gasket: Place the gasket on the transmission pan, ensuring all holes align perfectly.
Hand Tightening: Start by hand-tightening the bolts. This initial step ensures the pan sits evenly and prevents cross-threading.
Follow the Sequence: As discussed earlier, follow the crisscross pattern. Begin with the center bolts and work your way outwards.
Use the Torque Wrench: Once all bolts are hand-tightened, use the torque wrench to apply the final torque. Ensure you’re within the recommended torque specs to prevent over-torquing.
Double-Check: After torquing all bolts, it’s a good practice to go over them once more to ensure even torquing and that none were missed.
Post-Tightening Tips
After the initial tightening, it’s advisable to check the torque after a short drive. The heat and vibrations can sometimes cause bolts to settle.
Regularly inspect for any signs of leaks. If you spot any, it might indicate uneven torquing or a compromised gasket.
Credit: www.corvetteforum.com
What are the Torque Specs for Transmission Pan Bolts?
There are a variety of torque specs for transmission pan bolts, depending on the make and model of the vehicle. For example, transmission pan bolts on a Honda Accord should be tightened to between 7-9 ft.-lbs., while those on a Ford F-150 should be tightened to between 15-18 ft.-lbs.
Always consult your vehicle’s owner’s manual or a certified mechanic for the most accurate torque specs for your particular vehicle.
How Many Pan Bolts Does a 6L80 Have?
A 6L80 transmission has 18 bolts that hold the pan in place.
What is the Torque for Oil Pan?
Most cars have a drain plug on the bottom of the oil pan that is tightened to a specific torque. This ensures that the drain plug will not leak and that it is tight enough to not come loose. The torque for an oil pan can vary depending on the car, but it is usually between 15 and 25 ft-lbs.
Can You Over-Tighten a Transmission Pan?
The short answer is yes, you can over-tighten a transmission pan. The reason why this happens is that the bolts that hold the transmission pan in place are only meant to be tightened to a certain degree.
Once they are overtightened, the bolts can strip and break, which will cause your transmission pan to come loose and possibly fall off. This can lead to serious damage to your transmission, so it’s important to be careful when tightening the bolts on your transmission pan. If you’re not sure how tight to make them, consult a professional or the manufacturer’s instructions.
Conclusion
In the vast orchestra of automotive components, the 6L80 transmission stands out as a key player, delivering performance and reliability. The torque specs of its pan might seem like a minor detail, but as we’ve journeyed through this guide, it’s evident that it plays a pivotal role in the transmission’s symphony.
Ensuring the correct torque specs is not just a maintenance task—it’s a commitment. A commitment to the longevity of the transmission, to the seamless performance of the vehicle, and to the safety of its occupants. It’s about understanding the balance between force and precision, ensuring every bolt is tightened just right, and every seal is perfect.
As we wrap up, remember that regular checks, using the right tools, and adhering to manufacturer guidelines are our allies. They ensure that our 6L80 transmission, much like a well-tuned instrument, continues to perform harmoniously for miles to come.
See Also:
- Transmission Oil Pan Torque Specs
- 4L80E Transmission Pan Torque Specs
- Dodge Transmission Pan Torque Specs